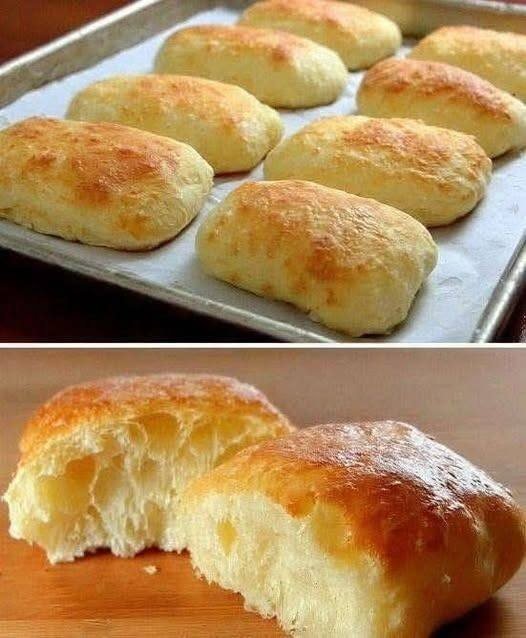
No-Knead Homemade Bread Rolls (No Eggs, No Butter, Budget-Friendly)
If you’re looking for a simple, affordable, and satisfying bread recipe, No-Knead Homemade Bread Rolls are the perfect solution. These soft and fluffy rolls require no eggs, no butter, and no complicated techniques, making them ideal for beginner bakers or anyone wanting to bake delicious bread on a budget.
Homemade bread doesn’t have to be expensive or time-consuming. With just a few pantry staples—flour, yeast, water, sugar, and salt—you can create warm, freshly baked rolls that are perfect for sandwiches, soups, or simply enjoying with a little jam or honey.
What makes this recipe special is the no-knead method. Instead of spending time kneading the dough, you simply mix the ingredients and allow time to do the work. As the dough rests, the gluten develops naturally, resulting in soft, airy bread rolls with minimal effort.
These rolls are perfect for families, students, or anyone looking for a reliable homemade bread recipe that doesn’t require expensive ingredients.
Why You’ll Love This Recipe
There are many reasons these no-knead bread rolls have become a favorite for home bakers.
-
No kneading required
-
No eggs or butter needed
-
Very affordable ingredients
-
Soft and fluffy texture
-
Perfect for beginners
Because the recipe is so simple, it’s also a great way to start learning the basics of bread baking.
Ingredients
This recipe uses only a handful of inexpensive pantry ingredients.
-
3½ cups all-purpose flour
-
1½ cups warm water
-
2 teaspoons active dry yeast
-
1 tablespoon sugar
-
1 teaspoon salt
-
2 tablespoons vegetable oil
Optional topping:
-
Sesame seeds
-
Poppy seeds
-
Oats
These ingredients create soft rolls with a light texture and a mild flavor that pairs well with many meals.
Step-by-Step Instructions
1. Activate the Yeast
In a large mixing bowl, combine the warm water, sugar, and yeast.
Stir gently and allow the mixture to sit for 5–10 minutes until it becomes foamy. This step ensures the yeast is active and ready to help the dough rise.
2. Mix the Dough
Add the flour, salt, and vegetable oil to the yeast mixture.
Stir everything together with a spoon or spatula until a sticky dough forms. There is no need to knead the dough.
The mixture may look slightly rough, but that’s perfectly normal.
3. Let the Dough Rise
Cover the bowl with a clean kitchen towel or plastic wrap.
Place it in a warm area and allow the dough to rise for 1 to 1½ hours, or until it doubles in size.
During this time, the yeast produces air bubbles that help create soft, fluffy rolls.
4. Shape the Rolls
Once the dough has risen, lightly flour your hands.
Gently scoop portions of dough and shape them into small balls. Place them on a baking tray lined with parchment paper.
Leave space between each roll so they can expand while baking.
5. Second Rise
Cover the rolls lightly with a towel and let them rest for 20–30 minutes.
This short resting time helps the rolls become even lighter and softer.
6. Add Optional Toppings
If desired, lightly brush the tops with water or oil and sprinkle sesame seeds, oats, or poppy seeds.
This adds a little extra flavor and texture.
7. Bake the Rolls
Preheat your oven to 375°F (190°C).
Bake the rolls for 18–22 minutes, or until they turn golden brown.
Your kitchen will fill with the wonderful aroma of freshly baked bread.
8. Cool and Serve
Remove the rolls from the oven and place them on a wire rack to cool slightly.
Serve warm for the best taste and texture.
Tips for Perfect No-Knead Bread Rolls
Use Warm Water
The water should be warm but not hot. Excessive heat can kill the yeast.
Keep the Dough Slightly Sticky
A slightly sticky dough helps produce soft and fluffy bread.
Allow Enough Rising Time
Proper rising is essential for light, airy rolls.
Don’t Add Too Much Flour
Too much flour can make the rolls dense instead of soft.
Budget-Friendly Baking Tips
One reason this recipe is so popular is its affordability.
Here are a few ways to keep homemade bread inexpensive:
-
Buy flour in larger bags for better value
-
Store yeast in the refrigerator to keep it fresh longer
-
Use vegetable oil instead of butter
-
Make larger batches and freeze extras
Baking bread at home can be significantly cheaper than buying bakery rolls.
Serving Ideas
These versatile bread rolls pair well with many meals.
Serve them with:
-
Butter and jam
-
Honey or peanut butter
-
Soups and stews
-
Sandwich fillings
-
Scrambled eggs for breakfast
Because the flavor is mild, they work well with both sweet and savory toppings.
How to Store the Rolls
Room Temperature
Store the rolls in an airtight container for 2–3 days.
Refrigerator
They can last up to 5 days when refrigerated.
Freezer
Freeze the rolls for up to 2 months. Simply reheat them in the oven for a few minutes before serving.
Why No-Knead Bread Works
Traditional bread recipes rely on kneading to develop gluten, which gives bread its structure. In no-knead recipes, time replaces kneading.
As the dough rests, natural fermentation occurs, strengthening the dough and creating air pockets. This process results in bread that is soft, airy, and full of flavor with minimal effort.
Final Thoughts
No-Knead Homemade Bread Rolls prove that baking bread doesn’t need to be complicated or expensive. With just a few simple ingredients and some patience while the dough rises, you can create warm, fluffy rolls right in your own kitchen.
This budget-friendly recipe is perfect for beginners and experienced bakers alike. Once you see how easy it is to make homemade bread, you may never want to rely on store-bought rolls again.