Homemade Cinnamon Rolls Recipe: Soft, Fluffy, and Irresistibly Sweet
Few treats are as comforting and indulgent as freshly baked cinnamon rolls. Soft, pillowy dough, swirls of cinnamon-sugar, and a luscious glaze make every bite unforgettable. The beauty of making them at home is that you control the sweetness, freshness, and love that goes into every roll. This step-by-step guide will show you how to create bakery-quality cinnamon rolls in your own kitchen—perfect for breakfast, brunch, or any special occasion.
Ingredients
For the Dough:
-
1 cup (240 ml) warm milk (110°F / 43°C)
-
2 ¼ teaspoons (1 packet) active dry yeast
-
½ cup (100 g) granulated sugar
-
⅓ cup (75 g) unsalted butter, melted
-
1 teaspoon salt
-
2 large eggs
-
4 cups (500 g) all-purpose flour
For the Filling:
-
¾ cup (150 g) brown sugar, packed
-
2 tablespoons ground cinnamon
-
¼ cup (60 g) unsalted butter, softened
For the Glaze:
-
1 cup (120 g) powdered sugar
-
2 tablespoons milk
-
½ teaspoon vanilla extract
Optional: A pinch of nutmeg or cardamom in the filling for extra warmth and depth of flavor.
Step 1: Prepare the Dough
Start by activating your yeast. Pour the warm milk into a large mixing bowl and sprinkle the yeast over the top. Allow it to sit for about 5–10 minutes until it becomes frothy. This indicates the yeast is alive and ready to work its magic.
Next, add the sugar, melted butter, salt, and eggs to the yeast mixture. Mix gently until everything is incorporated. Gradually add the flour, one cup at a time, mixing thoroughly after each addition. The dough should be soft and slightly sticky but manageable.
Knead the dough on a lightly floured surface for 8–10 minutes. Kneading develops the gluten, which gives your rolls their signature soft and fluffy texture. If using a stand mixer, use the dough hook attachment and knead for 5–6 minutes on medium speed.
Once kneaded, place the dough in a greased bowl, cover it with a clean kitchen towel or plastic wrap, and let it rise in a warm, draft-free area for 1–2 hours, or until it doubles in size. Patience here ensures the light, airy texture that makes cinnamon rolls irresistible.
Step 2: Prepare the Filling
While the dough rises, mix your filling ingredients. In a small bowl, combine the brown sugar and ground cinnamon. Stir well to ensure an even distribution of spice. The softened butter will later help the sugar-cinnamon mixture adhere to the dough and create those signature gooey swirls.
Step 3: Roll Out the Dough
Once the dough has doubled in size, punch it down gently to release the trapped air. Transfer it to a lightly floured surface and roll it into a rectangle approximately 16 x 12 inches. Even thickness ensures consistent baking.
Spread the softened butter evenly over the dough, leaving about half an inch of border along one edge. Sprinkle the cinnamon-sugar mixture generously over the butter, ensuring the entire surface is covered for maximum flavor in every bite.
Step 4: Roll and Cut
Starting from the long edge of the rectangle, roll the dough tightly into a log. Pinch the seam to seal it and prevent the rolls from unraveling during baking.
Use a sharp knife or dental floss to cut the log into 12 equal slices. Place each slice in a greased 9×13-inch baking dish, spacing them slightly apart to allow room for rising.
Cover the dish with a towel and let the rolls rise again for 30–45 minutes. This second rise helps the rolls become even fluffier and creates that signature soft texture.
Step 5: Bake the Cinnamon Rolls
Preheat your oven to 350°F (175°C). Bake the rolls for 25–30 minutes, or until they are golden brown on top and cooked through. Keep an eye on them during the last few minutes to avoid over-baking, which can dry out the rolls.
Once baked, remove the rolls from the oven and allow them to cool slightly for 5–10 minutes. This short cooling period is perfect for glazing—they should be warm enough to absorb the glaze without melting it entirely.
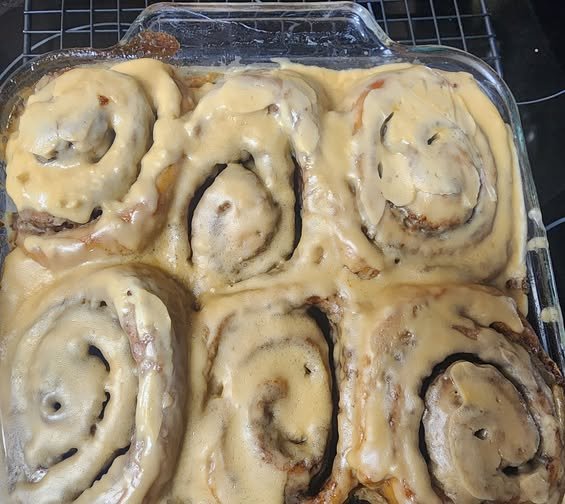
Step 6: Prepare the Glaze
In a small bowl, whisk together powdered sugar, milk, and vanilla extract until smooth. If you prefer a thinner glaze that drizzles beautifully, add a little extra milk. For a thicker, more decadent topping, use less milk.
Drizzle the glaze generously over the warm cinnamon rolls. Don’t be shy—allow it to pool into the swirls and edges for maximum sweetness and visual appeal.
Tips for Perfect Cinnamon Rolls
-
Use Fresh Yeast: Yeast past its prime can result in flat rolls. Always check the expiration date.
-
Warm, Not Hot Milk: Milk that’s too hot can kill the yeast, preventing the dough from rising. Aim for around 110°F (43°C).
-
Don’t Skip the Second Rise: It might be tempting, but the second rise ensures that soft, fluffy texture.
-
Optional Extras: Add chopped nuts, raisins, or even chocolate chips to the filling for extra indulgence.
-
Make Ahead: Cinnamon rolls freeze beautifully. Assemble the rolls, cover tightly, and freeze before the second rise. Thaw overnight in the fridge and bake the next day.
Serving and Storing
Cinnamon rolls are best enjoyed fresh and warm. Serve them as a delightful breakfast, a sweet brunch treat, or even dessert with a cup of coffee or tea.
Store leftovers in an airtight container at room temperature for up to 3 days. Reheat in the microwave for 15–20 seconds for a freshly baked taste. For longer storage, cinnamon rolls can be frozen for up to 2 months. Thaw and reheat as needed.
Conclusion
Homemade cinnamon rolls are a labor of love, but the payoff is pure bliss. Soft, fluffy dough, sweet cinnamon swirls, and a luscious glaze create a treat that will impress family and friends alike. With this recipe, you can create bakery-quality cinnamon rolls in your own kitchen, tailored to your sweetness preference and with a personal touch that no store-bought version can match.
Whether you enjoy them for a weekend breakfast, a special brunch, or just because, these cinnamon rolls are sure to become a favorite comfort food. So grab your mixing bowl, yeast, and cinnamon, and start baking—you’ll be rewarded with the warm, aromatic, and utterly delicious aroma of homemade cinnamon rolls filling your kitchen.