Soft Gluten-Free Bread Loaf – Easy, Fluffy & Perfect for Slicing
Finding a gluten-free bread that’s soft, flavorful, and sturdy enough for sandwiches can feel impossible. Many gluten-free loaves turn out dense, crumbly, or dry within hours. This homemade gluten-free bread loaf changes that completely. It’s light, tender, and easy to slice—perfect for toast, sandwiches, or enjoying warm with butter.
This recipe is designed for home bakers, using simple ingredients and clear steps. No complicated shaping, no kneading, and no special equipment required. The result is a dependable gluten-free loaf that tastes like real bread and stays soft for days.
Why You’ll Love This Gluten-Free Bread
-
Soft and fluffy texture without crumbling
-
Easy, one-bowl method
-
No kneading required
-
Perfect for sandwiches and toast
-
Naturally gluten-free and customizable
Whether you’re gluten-intolerant, celiac, or simply reducing gluten, this loaf delivers both texture and flavor.
Ingredients
Dry Ingredients
-
3 cups gluten-free all-purpose flour (with xanthan gum)
-
1 tablespoon sugar or honey
-
1 teaspoon salt
-
2¼ teaspoons instant yeast (1 packet)
Wet Ingredients
-
1 cup warm milk (or dairy-free milk)
-
2 large eggs, room temperature
-
¼ cup olive oil or melted butter
-
1 teaspoon apple cider vinegar
How to Make Gluten-Free Bread Loaf
Step 1: Prepare the Pan
Grease a standard 9×5-inch loaf pan and line with parchment paper for easy removal. Set aside.
Step 2: Mix Dry Ingredients
In a large bowl, whisk together the gluten-free flour, sugar, salt, and yeast. Make sure everything is evenly combined.
Step 3: Add Wet Ingredients
Add the warm milk, eggs, oil, and apple cider vinegar to the dry ingredients. Mix thoroughly using a spoon or hand mixer until the batter is smooth and thick. Gluten-free bread dough will be softer than traditional dough—closer to a thick batter.
Step 4: Rest and Rise
Transfer the dough into the prepared pan and smooth the top with a spatula. Cover loosely with a towel and let it rise in a warm place for 45–60 minutes, or until the loaf has risen about 1 inch above the pan.
Step 5: Bake
Preheat your oven to 375°F (190°C). Bake the bread for 40–45 minutes, or until the top is golden brown and the loaf sounds hollow when tapped.
If the top browns too quickly, loosely cover with foil during the last 10 minutes.
Step 6: Cool Completely
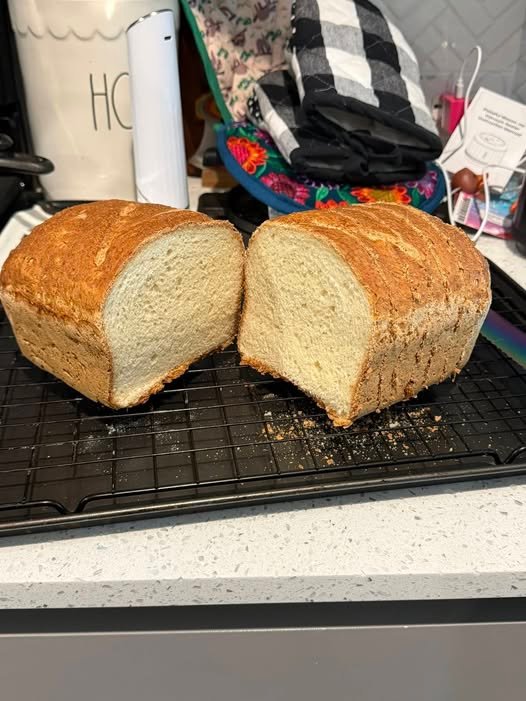
Remove the bread from the oven and let it cool in the pan for 10 minutes. Transfer to a wire rack and cool completely before slicing. This step is essential for structure.
Tips for the Best Gluten-Free Bread
-
Use flour with xanthan gum for proper structure
-
Do not over-rise—this can cause collapse
-
Let it cool fully before slicing
-
Measure flour accurately using the spoon-and-level method
-
Use room-temperature ingredients for best rise
Variations and Add-Ins
-
Dairy-Free: Use almond, oat, or coconut milk
-
Egg-Free: Replace eggs with flax eggs (texture will be denser)
-
Seeded Bread: Add sunflower, flax, or chia seeds
-
Herb Bread: Mix in dried rosemary or garlic powder
-
Sweet Loaf: Add extra honey and raisins
Serving Suggestions
This gluten-free bread loaf is perfect for:
-
Toast with butter or jam
-
Sandwiches and paninis
-
French toast
-
Garlic bread
-
Avocado toast
It toasts beautifully without falling apart.
Storage Instructions
-
Room temperature: 2 days (wrapped tightly)
-
Refrigerator: Up to 5 days
-
Freezer: Slice and freeze for up to 3 months
For best texture, toast slices after freezing.
Final Thoughts
This soft gluten-free bread loaf proves that gluten-free baking doesn’t have to be complicated or disappointing. With the right balance of ingredients and technique, you can enjoy a homemade loaf that’s fluffy, flavorful, and reliable every time.
Once you bake this bread, store-bought gluten-free loaves may never compare.