Homemade Gluten-Free Artisan Bread: Crispy Crust, Soft Center, No Compromises
Making gluten-free bread at home can feel intimidating. Many loaves turn out dense, dry, or crumbly, leaving you disappointed and reaching back for store-bought options. But this Homemade Gluten-Free Artisan Bread changes everything. With a crisp golden crust, soft and airy interior, and rustic bakery-style appearance, this loaf proves that gluten-free bread can be just as satisfying as traditional artisan bread.
Once you bake it, you’ll wonder why you ever settled for anything less.
What Makes This Gluten-Free Artisan Bread Special?
Unlike basic gluten-free sandwich bread, artisan bread focuses on texture, flavor, and structure. This recipe is designed to mimic classic European-style loaves while remaining completely gluten-free.
What sets it apart:
-
Crusty exterior with a bakery-style finish
-
Soft, open crumb instead of a gummy texture
-
Naturally flavored, not bland or starchy
-
No kneading required
-
Perfect for slicing, dipping, or serving with meals
This bread is proof that gluten-free baking doesn’t have to be complicated or disappointing.
Understanding Gluten-Free Bread Structure
Traditional bread relies on gluten to trap air and create structure. Gluten-free bread uses a carefully balanced blend of flours and binders to achieve the same effect.
Key components include:
-
Gluten-free flour blend for body
-
Psyllium husk or xanthan gum for elasticity
-
Yeast for rise and flavor
-
Moisture-rich dough for a soft interior
The result is a dough that behaves more like a thick batter—exactly what gluten-free bread needs.
Ingredients You’ll Need
For one artisan loaf:
-
300 g (2½ cups) gluten-free all-purpose flour blend (with rice flour, starches)
-
2 tbsp psyllium husk powder (or 1½ tsp xanthan gum)
-
7 g (2¼ tsp) instant yeast
-
1½ tsp salt
-
1 tbsp honey or maple syrup
-
1 tbsp olive oil
-
360 ml (1½ cups) warm water
Optional additions:
-
Seeds (sunflower, pumpkin, sesame)
-
Herbs (rosemary, thyme)
-
A dusting of rice flour for shaping
Step-by-Step Instructions
Step 1: Activate the Yeast
In a large bowl, mix warm water, honey, and yeast. Let it sit for 5–10 minutes until foamy. This step ensures the yeast is alive and active.
Step 2: Mix the Dry Ingredients
In a separate bowl, whisk together the gluten-free flour, psyllium husk powder, and salt. This helps distribute the binder evenly, which is essential for proper texture.
Step 3: Combine and Mix
Add the dry ingredients to the yeast mixture along with olive oil. Stir until fully combined. The dough will be sticky and thick, not firm like wheat dough.
Let the dough rest for 10 minutes—this allows the psyllium husk to absorb moisture and create structure.
Step 4: Shape and Rise
Using wet hands, shape the dough into a round loaf and place it on parchment paper. Cover loosely and let rise in a warm place for 45–60 minutes, until slightly puffed.
Gluten-free bread won’t double in size, but it should visibly expand.
Step 5: Bake Like an Artisan
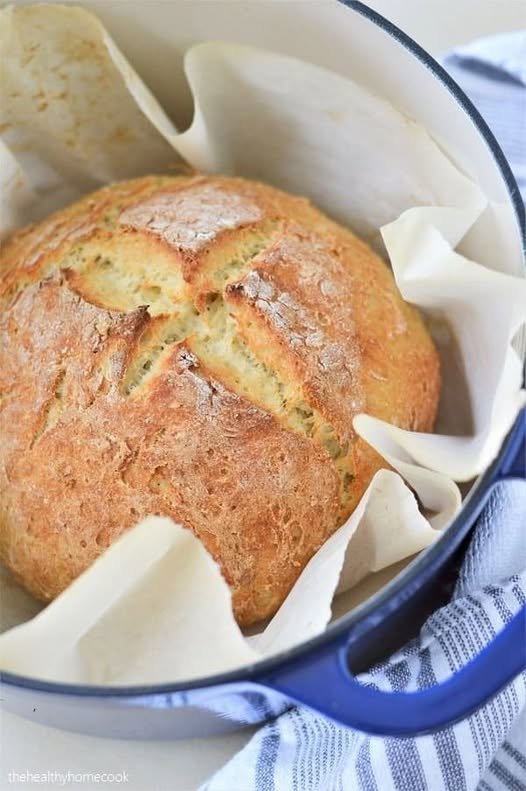
Preheat your oven to 230°C (450°F) with a Dutch oven or heavy baking pot inside.
Carefully transfer the dough (with parchment) into the hot pot, cover with the lid, and bake:
-
30 minutes covered
-
15–20 minutes uncovered until deeply golden
The steam created inside the pot gives the bread its signature artisan crust.
Step 6: Cool Completely
Remove the bread and let it cool on a wire rack for at least 1 hour before slicing. Cutting too early can cause a gummy texture.
Pro Tips for Perfect Gluten-Free Artisan Bread
-
Weigh ingredients for best accuracy
-
Dough should be wet, not dry
-
Psyllium husk gives better texture than xanthan gum
-
Let the bread cool fully before slicing
-
Bake until the crust is deep golden—not pale
Flavor Variations
-
Seeded Artisan Loaf: Add mixed seeds to the dough
-
Herb Bread: Fold in rosemary, garlic, or thyme
-
Olive Bread: Add chopped olives and a drizzle of olive oil
-
Rustic Boule: Dust with rice flour for a bakery look
How to Serve Gluten-Free Artisan Bread
This loaf is incredibly versatile:
-
Slice and serve with butter or olive oil
-
Use for bruschetta or crostini
-
Pair with soups and stews
-
Toast for breakfast with jam or honey
-
Serve alongside cheese boards
It’s sturdy enough for dipping yet soft enough for everyday use.
Storage and Freezing
-
Room temperature: 1–2 days wrapped in a cloth
-
Refrigerator: Up to 5 days (toast before serving)
-
Freezer: Slice and freeze up to 2 months
Always reheat or toast for the best texture.
Why This Recipe Works
The balance of moisture, binder, and baking method creates a loaf that feels authentic, rustic, and satisfying. Instead of trying to imitate sandwich bread, this recipe embraces the strengths of gluten-free baking—resulting in a bread that stands proudly on its own.
Final Thoughts
This Homemade Gluten-Free Artisan Bread proves that gluten-free doesn’t mean flavor-free or texture-free. With its crackly crust, soft interior, and rustic charm, it delivers everything you want from an artisan loaf—without the gluten.
Bake it once, share it with friends, and enjoy bread again with confidence. This isn’t just gluten-free bread—it’s real bread, reimagined.