No-Bake Pineapple Pie
If you’re craving a light, refreshing dessert that’s incredibly easy to make, this No-Bake Pineapple Pie is the perfect choice. With its creamy texture, tropical pineapple flavor, and buttery crust, this pie delivers a delicious treat without ever turning on the oven. It’s ideal for warm days, last-minute gatherings, or anytime you want a quick and satisfying dessert.
Why You’ll Love This Recipe
This no-bake pie is a favorite for many reasons:
- No oven required – perfect for hot weather
- Quick and easy – minimal prep time
- Light and creamy – not overly heavy
- Tropical flavor – sweet pineapple in every bite
- Great for make-ahead – chills beautifully in the fridge
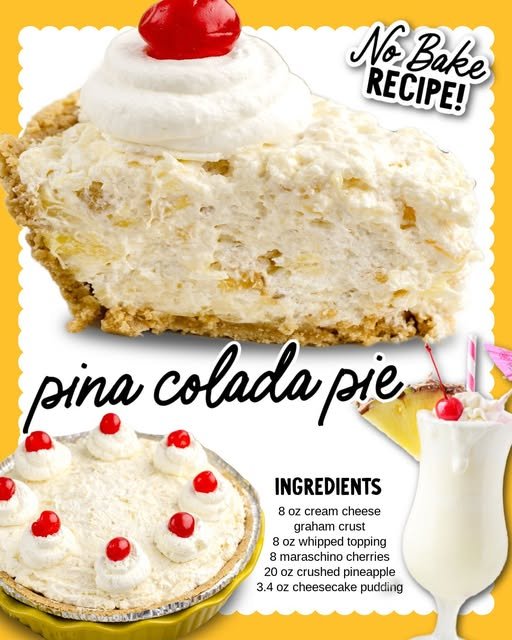
Ingredients
For the crust:
- 1 ½ cups graham cracker crumbs
- ⅓ cup melted butter
- 2 tablespoons sugar
For the filling:
- 1 can (20 oz) crushed pineapple, well drained
- 1 package (8 oz) cream cheese, softened
- ½ cup powdered sugar
- 1 teaspoon vanilla extract
- 1 container (8 oz) whipped topping (like Cool Whip)
Optional topping:
- Extra whipped topping
- Pineapple chunks
- Maraschino cherries
Instructions
1. Prepare the Crust
In a bowl, combine graham cracker crumbs, sugar, and melted butter. Mix until the texture resembles wet sand. Press the mixture firmly into a 9-inch pie dish to form an even crust. Place it in the refrigerator to set while you prepare the filling.
2. Make the Creamy Filling
In a large mixing bowl, beat the softened cream cheese until smooth and creamy. Add powdered sugar and vanilla extract, mixing until fully combined and lump-free.
3. Add the Pineapple
Gently fold in the well-drained crushed pineapple. Make sure there’s no excess liquid, as this can make the pie too soft.
4. Fold in the Whipped Topping
Add the whipped topping and fold gently until the mixture is light, fluffy, and evenly combined.
5. Assemble the Pie
Spoon the filling into the prepared crust and smooth the top with a spatula.
6. Chill Until Set
Refrigerate the pie for at least 4–6 hours, or overnight for best results. This allows the filling to firm up and the flavors to blend beautifully.
7. Garnish and Serve
Before serving, top with extra whipped topping, pineapple chunks, or cherries if desired. Slice and enjoy chilled.
Tips for Best Results
- Drain the pineapple well: Excess liquid can prevent the pie from setting properly
- Use softened cream cheese: This ensures a smooth, lump-free filling
- Chill thoroughly: The longer it chills, the better the texture
- Press crust firmly: A compact crust holds together better when slicing
Variations and Add-Ins
Make this pie your own with these easy twists:
- Coconut Pineapple Pie: Add shredded coconut for a tropical vibe
- Lime Twist: Mix in a bit of lime juice or zest for a citrus kick
- Nutty Crunch: Add chopped pecans or walnuts to the crust
- Layered Dessert: Add a thin layer of vanilla pudding for extra creaminess
Storage
- Store covered in the refrigerator for up to 4 days
- Do not freeze, as the texture may become watery when thawed
Serving Suggestions
This pie is perfect for:
- Summer gatherings and BBQs
- Family dinners
- Potlucks and picnics
- Light desserts after a heavy meal
Serve it cold for the most refreshing experience.
Final Thoughts
This No-Bake Pineapple Pie is proof that simple ingredients can create something truly delicious. Its creamy texture, sweet pineapple flavor, and buttery crust make it a crowd-pleasing dessert that’s both easy and impressive.