Homemade Gluten-Free Puff Pastry with Beautiful Flaky Layers
Making puff pastry at home may sound intimidating, but it’s absolutely possible—even without gluten. This homemade gluten-free puff pastry creates delicate, buttery layers that puff beautifully in the oven. With the right ingredients and a simple folding technique, you can achieve a pastry that’s perfect for tarts, turnovers, appetizers, and elegant desserts.
Traditional puff pastry relies on gluten to build structure, but gluten-free versions use carefully balanced flours and starches to mimic that elasticity. When cold butter is layered between thin sheets of dough, steam forms during baking and lifts the dough into the classic flaky layers.
Why Make Gluten-Free Puff Pastry?
Homemade gluten-free pastry offers several advantages:
Better flavor
Store-bought gluten-free pastry can sometimes taste bland, but homemade dough lets the buttery flavor shine.
Control over ingredients
You can choose high-quality flours and avoid preservatives.
Versatile
Use it for both sweet and savory recipes.
Beautiful flaky texture
Proper folding creates the signature puff pastry layers.
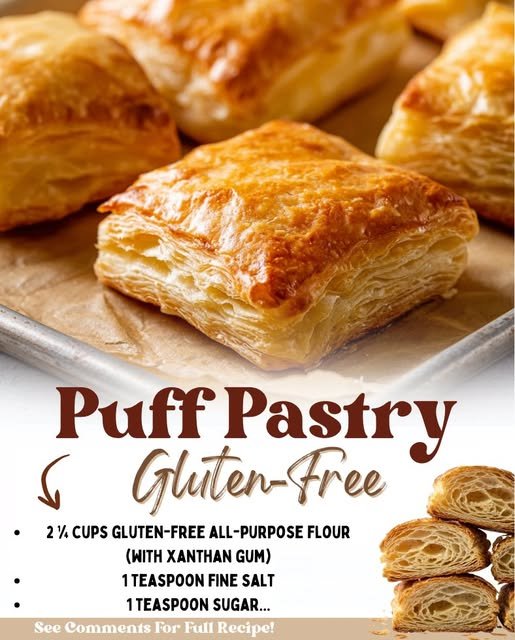
Ingredients
-
1 ½ cups Gluten-Free Flour blend
-
½ cup Rice Flour
-
½ teaspoon salt
-
1 teaspoon sugar (optional for sweet pastries)
-
1 teaspoon xanthan gum (if not included in flour blend)
-
¾ cup cold Butter, cubed
-
½ cup ice water
-
1 teaspoon Apple Cider Vinegar
Instructions
1. Prepare the Dough
In a large mixing bowl, combine:
-
gluten-free flour blend
-
rice flour
-
salt
-
sugar
-
xanthan gum
Mix well.
Add half of the cold butter cubes and gently rub them into the flour mixture until it resembles coarse crumbs.
2. Add Liquid
Mix the ice water with apple cider vinegar.
Slowly add the liquid to the flour mixture, stirring until the dough just comes together.
The dough should be slightly shaggy but not sticky.
3. Form the Butter Layer
On a lightly floured surface, roll the dough into a rectangle.
Place the remaining cold butter cubes in the center and flatten them slightly with a rolling pin.
Fold the dough over the butter like an envelope.
4. Roll and Fold
Roll the dough into a long rectangle.
Fold it into thirds like a letter.
This is called the lamination process, which creates layers.
Wrap the dough in plastic wrap and refrigerate for 30 minutes.
Repeat the rolling and folding process 3–4 times, chilling the dough between folds.
5. Final Chill
After the final fold, refrigerate the dough for at least 1 hour before using.
This allows the butter to firm up and helps the pastry puff properly.
How to Use Gluten-Free Puff Pastry
Once the dough is chilled, roll it out to about ⅛ inch thickness and use it in a variety of recipes.
Some delicious ideas include:
-
Fruit turnovers
-
Savory vegetable tarts
-
Cheese straws
-
Chicken pot pie crust
-
Mini pastries
Baking Tips
Keep everything cold
Cold butter is the key to flaky layers.
Work quickly
If the butter starts melting, place the dough back in the refrigerator.
Use parchment paper
This prevents sticking and helps maintain shape.
Bake at high heat
Puff pastry usually bakes best around 400°F (200°C).
Why Puff Pastry Becomes Flaky
The magic of puff pastry comes from the layering technique.
Thin sheets of dough alternate with layers of butter. When baked, the butter melts and releases steam, causing the layers to expand and separate. This creates the classic airy, flaky texture.
Even in gluten-free dough, this process still works when the dough is handled carefully.
Storage Tips
Refrigerator:
Wrap tightly and store for up to 3 days.
Freezer:
Freeze the dough for up to 2 months. Thaw in the refrigerator before using.
Pre-rolled sheets:
You can freeze rolled pastry sheets separated by parchment paper for convenience.
Final Thoughts
Homemade gluten-free puff pastry may require a little patience, but the results are incredibly rewarding. The combination of buttery flavor and delicate flaky layers makes it perfect for both elegant desserts and savory dishes.