Easy Chocolate Caramel Nut Bars
If you love the irresistible combination of rich chocolate, buttery caramel, and crunchy nuts, these Easy Chocolate Caramel Nut Bars are about to become your new favorite homemade treat. They taste just like a gourmet candy bar—but they’re surprisingly simple to make at home with pantry staples.
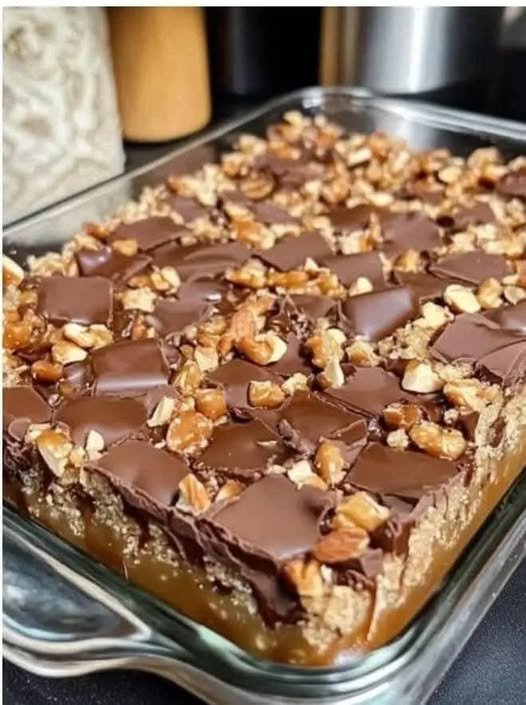
Perfect for holidays, bake sales, dessert platters, or an afternoon indulgence with coffee, these bars feature three delicious layers: a soft buttery base, a gooey caramel nut center, and a smooth chocolate topping. The contrast of textures—crumbly, chewy, and crunchy—makes every bite absolutely satisfying.
Best of all? No complicated techniques required.
Why You’ll Love This Recipe
-
Easy, beginner-friendly recipe
-
No candy thermometer needed
-
Perfect make-ahead dessert
-
Customizable with your favorite nuts
-
Stores beautifully for days
Whether you’re making them for guests or simply to satisfy your sweet tooth, these bars deliver bakery-style results with minimal effort.
Ingredients
For the Base:
-
1 cup (225g) unsalted butter, softened
-
½ cup (100g) granulated sugar
-
2 cups (250g) all-purpose flour
-
¼ teaspoon salt
For the Caramel Nut Layer:
-
1 cup (200g) brown sugar
-
½ cup (120ml) heavy cream
-
½ cup (115g) unsalted butter
-
2 tablespoons honey or corn syrup
-
1 teaspoon vanilla extract
-
1½ cups (180g) mixed nuts (pecans, almonds, walnuts, or peanuts), roughly chopped
For the Chocolate Topping:
-
1½ cups (250g) semi-sweet chocolate chips
-
1 tablespoon butter or coconut oil (optional, for shine)
Step-by-Step Instructions
Step 1: Prepare the Base
Preheat your oven to 350°F (175°C). Line a 9×13-inch baking pan with parchment paper, leaving some overhang for easy removal.
In a mixing bowl, cream together the softened butter and sugar until light and fluffy. Add flour and salt, mixing until a soft dough forms.
Press the dough evenly into the bottom of the prepared pan.
Bake for 15–18 minutes, or until lightly golden. Remove from oven and set aside.
Step 2: Make the Caramel Nut Layer
In a medium saucepan over medium heat, combine brown sugar, butter, heavy cream, and honey. Stir constantly until the butter melts and the mixture begins to bubble.
Let it simmer gently for 3–4 minutes, stirring continuously until slightly thickened.
Remove from heat and stir in vanilla and chopped nuts.
Pour the caramel nut mixture evenly over the baked crust, spreading carefully.
Return to the oven and bake for 15–18 minutes, until the caramel is bubbling and slightly darker in color.
Remove and allow to cool for about 15 minutes.
Step 3: Add the Chocolate Layer
Place chocolate chips and butter (if using) in a microwave-safe bowl. Heat in 20–30 second intervals, stirring between each, until smooth and melted.
Pour the melted chocolate over the warm caramel layer and spread evenly with a spatula.
Let the bars cool at room temperature, then refrigerate for at least 1–2 hours until fully set.
Cutting Tips for Perfect Bars
For clean slices:
-
Use a sharp knife
-
Wipe the knife clean between cuts
-
Slightly warm the knife under hot water for smoother edges
-
Let the bars sit at room temperature 10–15 minutes before slicing
Flavor Variations
These bars are incredibly versatile. Try these ideas:
Salted Caramel Version:
Sprinkle flaky sea salt on top of the chocolate before it sets.
Peanut Lover’s Bars:
Use roasted peanuts and drizzle extra melted peanut butter over the chocolate.
Dark Chocolate Twist:
Replace semi-sweet chocolate with dark chocolate for a richer flavor.
Holiday Style:
Add a sprinkle of crushed candy canes or festive sprinkles before the chocolate sets.
Storage Instructions
Store bars in an airtight container:
-
At room temperature: up to 4 days
-
In the refrigerator: up to 1 week
-
In the freezer: up to 2 months (wrap individually)
If chilled, allow them to soften slightly before serving for the best texture.
Pro Tips for Success
-
Don’t overcook the caramel—it will continue to thicken as it cools.
-
Line the pan with parchment for easy removal.
-
Use quality chocolate for the best flavor.
-
Toast your nuts lightly beforehand for extra depth and crunch.
Nutritional Note
While these bars are indulgent, they do provide some benefits:
-
Nuts add healthy fats and protein
-
Dark chocolate (if used) contains antioxidants
-
Homemade means no preservatives
As with all desserts, enjoy in moderation!
Frequently Asked Questions
Can I make these without nuts?
Yes! Replace nuts with shredded coconut or simply omit them for a smooth caramel layer.
Why is my caramel too hard?
It was likely cooked too long. Reduce simmering time slightly next time.
Can I use store-bought caramel?
You can, but homemade caramel gives better flavor and texture.
Do I need to refrigerate them?
Refrigeration helps the chocolate set faster, but they can set at room temperature as well.
Final Thoughts
These Easy Chocolate Caramel Nut Bars are the ultimate homemade treat—rich, chewy, crunchy, and deeply satisfying. They’re simple enough for beginner bakers yet impressive enough for special occasions.
Once you make them, don’t be surprised if friends and family start requesting them again and again. One bite of that buttery crust, gooey caramel, crunchy nuts, and silky chocolate—and you’ll understand why